
Braai area ideas matters because the right choice affects heat, safety, installation cost and long-term value for South African homes.
For broader fire safety guidance, the Fire Protection Association of South Africa is a useful independent reference alongside professional installer advice.
Affordable Outdoor Braai Installation Ideas for Small Backyards
Got a small backyard in Cape Town and thinking there’s no room for a proper braai? Even a small braai setup can transform your backyard into something special. Think again. We’ve installed braais in backyards half the size of a single garage in places like Gordon’s Bay, Somerset West, and right across the Helderberg basin. The trick isn’t having more space — it’s using what you’ve got smarter.

South africans don’t need a massive garden to braai. Any outdoor space can work with the right approach. You need a decent layout, the right materials, and a bit of creativity. Here’s how to make it happen without spending a fortune. A great bbq area doesn’t need a massive budget — it needs smart planning.
Recommended Braais by Budget
Browse our most popular braais at every budget — live in-stock pricing, each linked to its product page for full specs.
Entry-level — under R15,000
- Home Fires – 580 Table braai — R3,737
- Home Fires – JanBraai kit complete — R4,576
- Economaster – 800 Basic built – in braai — R7,723
- Economaster – 800 Built – in braai — R9,980
Mid-range — R15,000–R28,000
- Northern Flame 970mm 4 – Burner Gas Insert / Tabletop Braai — R15,003
- Deluxe 1200 Built – in Braai — R15,368
- Home Fires – Super De Luxe 1000 Built – in Braai — R17,169
- Home Fires – Super De Luxe 1200 Built – in Braai — R17,853
Premium — R28,000 and up
- Northern Flame 1200 Stainless Steel Wood & Gas Combo Braai — R29,791
- Home Fires – Super De Luxe Spit 1200 Built – in Braai — R37,019
- Northern Flame 1000 Stainless Steel Full Gas Braai — R37,221
- Home Fires – Built – in Gas Braai 800mm — R38,275
Tell us what you need and we’ll send a free, no-obligation quote — fast.
Request a Free Braai Quote
Planning your Braai Area Layout
Before you buy a single brick, stand in your yard and think about how people actually move through it. Where does the back door open? Where do guests naturally gather? Which corner catches the least wind?
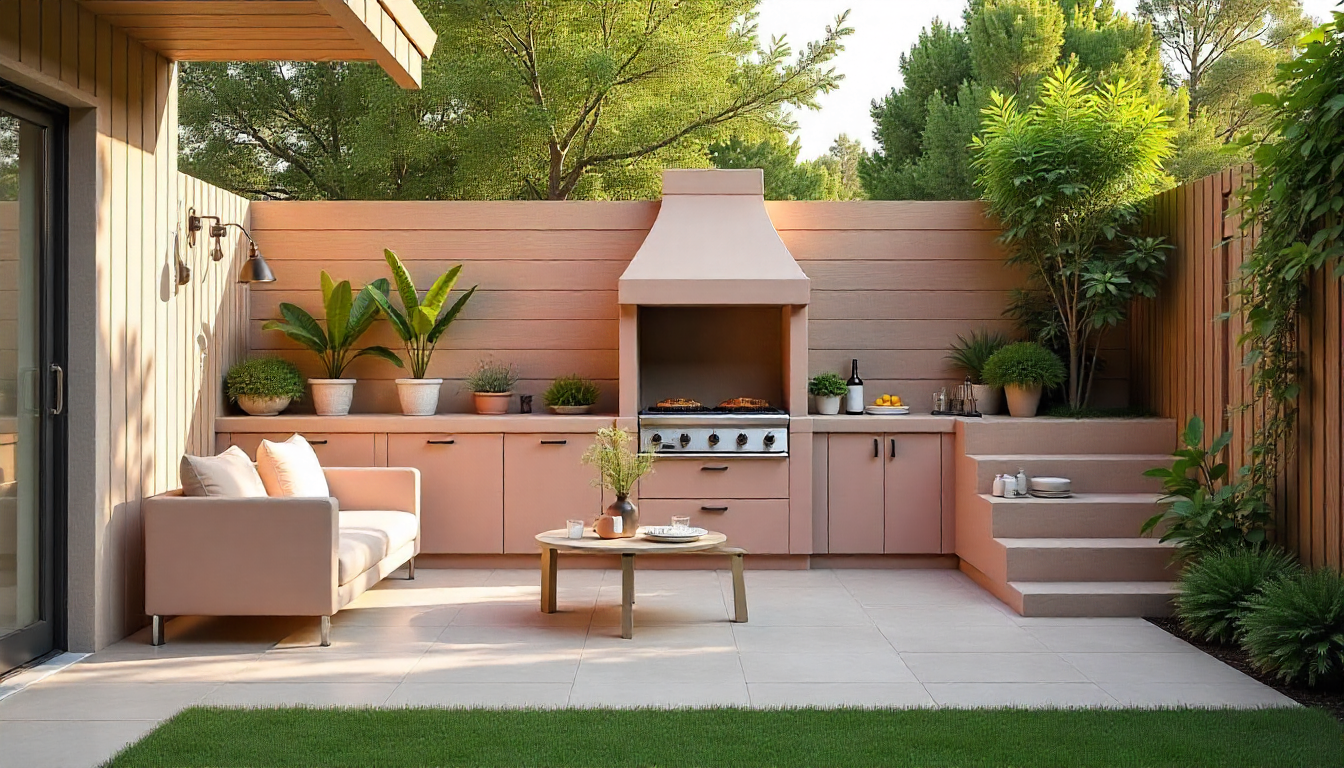
Whether you’re working with a patio, a courtyard, or a narrow strip of garden, the best small outdoor braai setups tuck the cooking area into a corner or along a side wall. This frees up the centre of your space for seating and movement. A corner braai area means smoke blows away from your guests instead of into their faces.
Draw a rough plan on paper. Mark your doors, windows, and any fixed structures. Then sketch in where the braai, prep space, and seating could go. You don’t need to be an architect — a basic area design on paper saves a lot of headaches later.
Built-in Braai vs Freestanding Steel Braai
This is the first call you’ll make, and it matters. A built-in braai looks permanent and polished. It adds proper value to your property and becomes a feature of your outdoor living space — and can even form part of a small outdoor kitchen. But it costs more and you can’t move it if you rearrange.
A freestanding steel braai is the smarter pick for a small backyard. It’s portable, cheaper upfront, and you can reposition it whenever you want. Need more room for a party? Push it to the side. Winter coming? Shift it under cover. The Home Fires 800 freestanding braai, for example, fits into a tight corner and still gives you a solid 800mm cooking surface.
For renters or anyone who might move, freestanding is a no-brainer. For homeowners planning to stay put, a built-in braai adds more resale value but locks you into one layout.
Outdoor Braai Ideas that Work in Small Spaces
Here’s where it gets fun. Some of the best braai area ideas we’ve seen come from tight spaces where the owner had to get creative. A well-planned bbq area or outdoor bbq setup in a compact space beats a sprawling but poorly laid-out one every time.

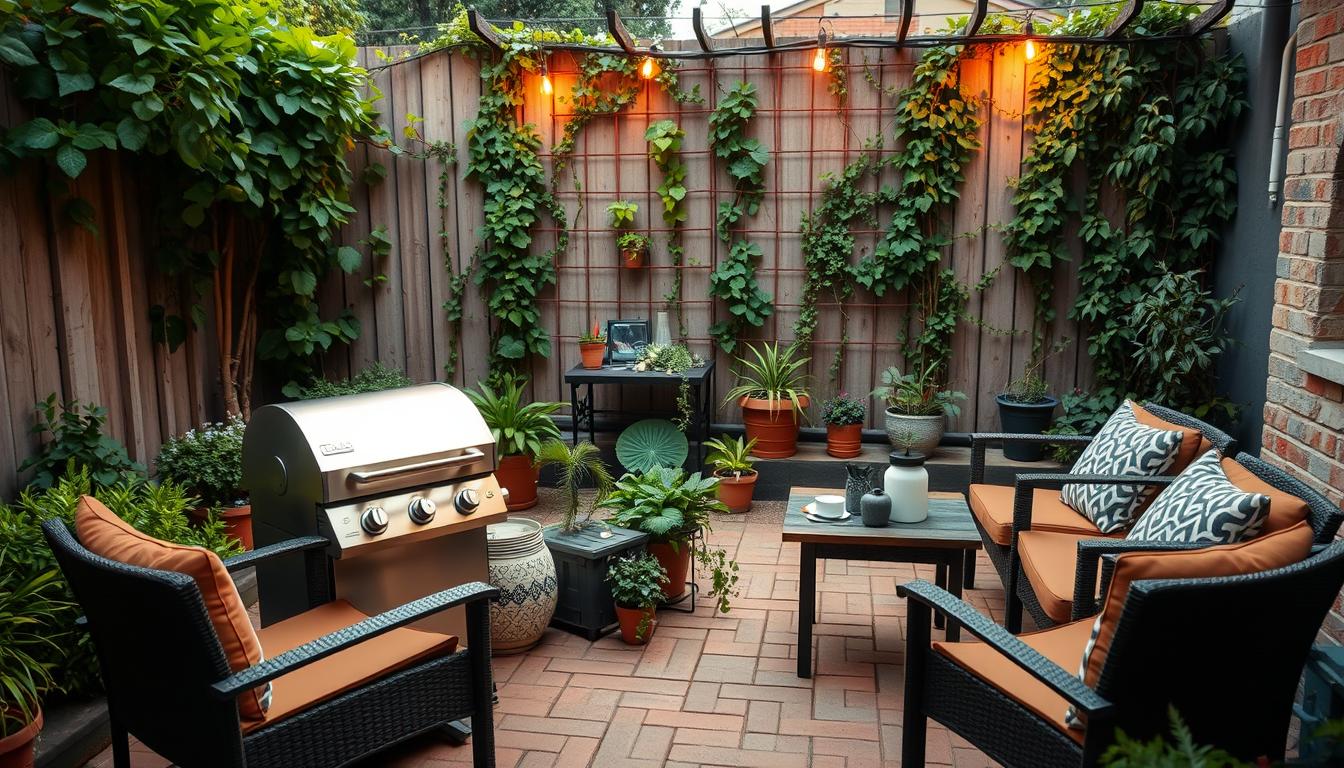
Corner Braai Stations
A corner setup tucks your braai into dead space that you weren’t using anyway. Add a narrow prep shelf on one side and a small bench on the other. You’ve just created a functional cooking area — the perfect outdoor grill area for a small braai — without eating into your main yard.
Along a Boundary Wall
If your yard has a boundary wall or fence line, run your braai setup along it. A counter-height prep surface doubles as a serving area. String some lights overhead and you’ve got an entertainment area perfect for gathering with friends that feels intentional, not cramped.
Pallet and Reclaimed Wood Setups
Sand and seal a few pallets for a prep counter. Add reclaimed wood benches for seating. It costs almost nothing, looks rustic and stylish, and you can dismantle it in an afternoon if you want to change things up. Pinterest is full of these ideas for good reason — they work. We’ve seen clever pallet setups in areas in cape town like Rondebosch, Plumstead, and Wynberg.
Diy Braai Builds that Won’t Break the Bank

You don’t need a professional installer for every braai setup. A simple cinder block base with a steel grill on top costs less than R2000 — you could even add a small fire pit next to it for the cooler months. in materials from Build It or Builders Warehouse. Two columns of blocks, a few lintels, and a grid — that’s a working braai.
For something more permanent, a brick braai with a concrete slab base runs R3000 to R7000 in materials if you do the work yourself. Use baked clay bricks for the outer structure and fire bricks for the firebox. Standard mortar mix is one part cement to five parts building sand. Add plasticiser to keep it workable.
A freestanding steel braai like the Home Fires 580 table braai starts around R8000 and requires zero construction. Bolt it together, put it on a level surface, and you’re braaing tonight.
Covering and Weatherproofing Your Braai Area
Cape Town weather doesn’t mess around. One minute it’s calm, the next the southeaster is howling through the Helderberg. Your braai area needs protection.

If you’re doing a small renovation, a basic pergola with climbing plants gives you shade in summer and wind protection in winter. Retractable awnings are cheaper and work well for smaller spaces. A lean-to roof against your boundary wall is the most space-efficient option if you’re really tight on room.
Polycarbonate sheeting lets light through while keeping rain out. Twin-wall sheets are better insulated and quieter in heavy rain. Budget about R2000 to R4000 for a basic DIY cover depending on the size.
Good drainage matters. If water pools around your braai base, you’ve got a problem. Slope paving away from the cooking area and make sure gutters or channels carry runoff somewhere useful.
Styling Your Outdoor Cooking Space

Your braai area is part of your home. Treat it that way. A few weatherproof cushions on a built-in bench. A string of warm lights above the cooking area. Some native succulents in clay pots on the counter. These small touches turn a functional cooking spot into somewhere people actually want to sit.
For a modern braai setup, go with clean concrete surfaces, slim steel braai units, and minimalist lighting. These living spaces become an extension of your home. For a more traditional south african feel, brick and reclaimed wood create warmth without trying too hard. Whether you call it a braai area, an outdoor bbq zone, or just your weekend spot — neither is better — pick what suits your home and your style.
Want to go further? A small pizza oven next to your braai creates a chic outdoor cooking setup that neighbours will envy. But the best braai area isn’t the most expensive one. It’s the one that fits your space, gets used every weekend, and makes your friends want to stay a bit longer.
Small-space Seating and Braai Area Ideas for Gatherings
Here’s something most people get wrong about small braai areas — they overthink the braai and underthink the seating. Your mates aren’t coming for your fire skills alone. They’re coming for the gathering. The vibe. The cold ones passed across a counter while someone argues about when to flip the chops.
Built-in benches are your best friend in a tight braai area. Run one along a boundary wall, add a hinged lid, and suddenly you’ve got seating and storage in the same footprint. Braai tongs, firelighters, cushions — all tucked away. We’ve done this in backyards across Somerset West and it transforms a cramped entertainment area into something that actually works for 8 to 10 people.
Foldable furniture is underrated. A decent set of folding chairs and a collapsible table from a place like Cape Union Mart or even Game costs under R2000. Pack them away after the weekend and your small braai area becomes open space again. Bar-height stools work brilliantly around a counter-height prep surface — guests perch, chat, and stay out of your cooking zone. That’s a proper bbq area layout.
Weatherproof cushions in neutral tones finish the look without breaking your budget. R50 to R150 each at Mr Price Home. They soften hard bench seating and make the whole space feel intentional. A small backyard gathering doesn’t need a massive entertainment area. It needs smart seating that doesn’t eat your floor space.
Outdoor Kitchen Upgrades That Won’t Blow Your Budget
You don’t need R80 000 and a contractor to build an outdoor kitchen. Start with what you’ve got and add one thing at a time. A compact pizza oven next to your braai is probably the best upgrade you can make for under R5000. DeliVita and Clementi do proper ones, but even a basic clay oven from a local pottery works brilliantly for flatbreads and roasted veg.
A charcoal smoker opens up a whole new world of low-and-slow cooking. The Weber Smokey Mountain 18-inch runs around R6000 and fits into any outdoor space without drama. Pair it with your existing braai and you’ve got a grill area that handles everything from quick boerewors to 8-hour pulled pork.
Portable grill options make sense if you’re not ready to commit to built-in. A decent portable gas unit costs R2000 to R5000 and packs away when you need the space. The key is a solid prep surface — even a butcher’s block on wheels gives you somewhere to season, plate, and rest meat. That’s the difference between cooking outside and having an actual outdoor kitchen.
Storage is the unsexy upgrade that makes everything better. A waterproof cabinet or even a repurposed outdoor cupboard keeps your tools, charcoal, and spices organised. Add a small fire pit to the mix for winter evenings and your outdoor space becomes usable twelve months a year, not just in summer.
Paving, Decking and Landscaping Around Your Braai Zone
The ground under and around your braai matters more than people think. A braai sitting on bare grass looks temporary and creates a mud pit after the first rain. Proper paving or decking turns your outdoor space into a defined area design that feels permanent and put-together.
Paver patterns are the easiest budget win. Herringbone looks sharp and handles foot traffic well. A basic concrete paver from Corobrik or Bosun runs R8 to R15 per brick — a 3x3m patio area costs R1500 to R3000 in materials. Lay them on compacted sand with a slight slope for drainage and you’re sorted. If you want something warmer, clay pavers develop a beautiful patina over time.
Timber decking is the premium option but doesn’t have to cost a fortune. Treated pine decking boards from Timber City run around R90 to R140 per metre. A small 2x3m deck costs R3000 to R5000 in timber alone. It lifts your outdoor bbq area off the ground, adds texture, and creates a clear zone between garden and cooking space. Just make sure it’s properly sealed — Cape Town’s winter rain will punish untreated wood.
Vertical gardens and trellises are the secret weapon for small living spaces. A trellis with jasmine or a vertical planter with herbs doesn’t take any floor space but makes the area feel lush and enclosed. Planters with rosemary, thyme, and bay leaves along the edge of your braai zone look great and give you fresh herbs arm’s reach from the grill. Low-cost landscaping like river pebbles, indigenous groundcovers, and a few strategically placed agapanthus ties the whole area design together without needing a landscaper.
Frequently Asked Questions
How Much Does It Cost to Build a Braai Area?
A basic DIY braai area with a freestanding steel unit, pavers, and a small cover costs R5000 to R12000. A built-in brick braai with proper slab, insulation, and chimney runs R15000 to R30000 for materials. Professional installation adds R5000 to R15000 depending on complexity. For a small backyard, the budget-friendly option is almost always a freestanding braai on paving — you get the cooking experience without the construction bill.
What Makes a Good Braai Area?
Three things: airflow, clearances, and flow. Safety first — always. Airflow means smoke can escape without blowing back into your home. Clearances mean nothing flammable is close to the firebox. Flow means guests can move between the braai, the food, and their seats without squeezing past each other. If you nail these three, the rest is personal preference.
How Can I Add Shade to My Braai Area?
For any outdoor space, options range from a cheap retractable awning (R1500 to R3000) to a permanent timber pergola (R8000 to R20000). A polycarbonate roof is the sweet spot for most Cape Town backyards — it handles rain and wind, lets light through, and costs R2000 to R5000 for a typical 3x3m area. Shade sails are the cheapest option at around R800 to R1500, but they don’t handle heavy wind well.
What is the Best Material for a Braai?
For the firebox, fire bricks (refractory bricks rated to 1300°C) are non-negotiable. Standard clay bricks crack under direct heat. For the outer structure, baked clay bricks look great and last forever. For freestanding units, 304 stainless steel works well inland while 316 grade handles coastal salt air better. Mild steel is cheapest but needs regular repainting to prevent rust. 3CR12 is the budget-friendly stainless option with decent corrosion resistance.
How Do I Plan a Small Backyard Braai Layout?
Start with a rough sketch. Mark your doors, windows, fixed structures, and the direction of prevailing wind in your area. Place the braai downwind of seating and away from open windows. Leave at least 1 metre of clearance on all sides of the firebox. Then plan your prep surface, seating, and cover around that. If you’re unsure, walk through the space pretending you’re carrying a plate of food — you’ll quickly feel where the bottlenecks are.
Should I Choose a Built-in Braai or Freestanding Steel Braai?
Choose built-in if you own your home, plan to stay for years, and want to add property value. Choose freestanding if you’re renting, have a small or awkward space, or value flexibility. Freestanding braais cost less upfront (R1500 to R20000 vs R15000 to R30000+ for built-in) and you can take them with you. Both cook well — the difference is permanence versus portability.
How Do I Weatherproof My Outdoor Braai Area?
Install a roof or cover (polycarbonate, timber pergola, or retractable awning). Seal any brickwork with a quality waterproofer. Ensure drainage slopes away from the braai base. Use corrosion-resistant fixings (stainless or galvanised) for any exposed metal. A waterproof cover over a freestanding braai adds years to its life. In coastal areas, use 316 stainless steel — salt air will eat through mild steel in a single wet season.
What Are Affordable Braai Area Ideas for Small Spaces?
The cheapest approach: buy a freestanding braai (R1500 to R8000), lay down some second-hand pavers (R500 to R1500), and string up outdoor lights (R200 to R500). Total: under R10000 for a functional, decent-looking braai area. For a step up, add a DIY prep counter from reclaimed pallets (R200 in materials) and a basic shade sail (R800). You don’t need a big budget — you need a smart layout and decent materials.